SD Card Web Server I/O
In this part of the tutorial, everything covered so far comes together. HTML, JavaScript, CSS, HTTP, Ajax and the SD card are used to make a web page that displays Arduino analog and digital inputs and allows digital outputs to be controlled.
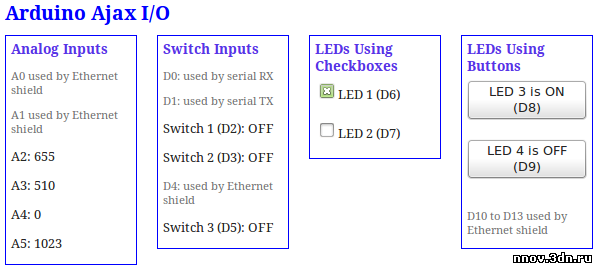
The Arduino web server hosts a web page that displays four analog input values and the state of three switches. The web page allows four LEDs to be controlled – two LEDs are controlled using checkboxes and two LEDs are controlled using buttons.
When more than one computer (web browser) is connected to the Arduino web server, then outputs (LEDs) switched on using one computer will be updated on the other computer – i.e. when a checkbox is clicked to switch an LED on from one computer, the checkbox will also be checked on the other computer automatically.
The following video shows two computers connected to the Arduino web server and as changes are made on the web page on one computer, they are updated on the other.
Web Server I/O Circuit Diagram
The circuit diagram for this part of the tutorial is shown here:
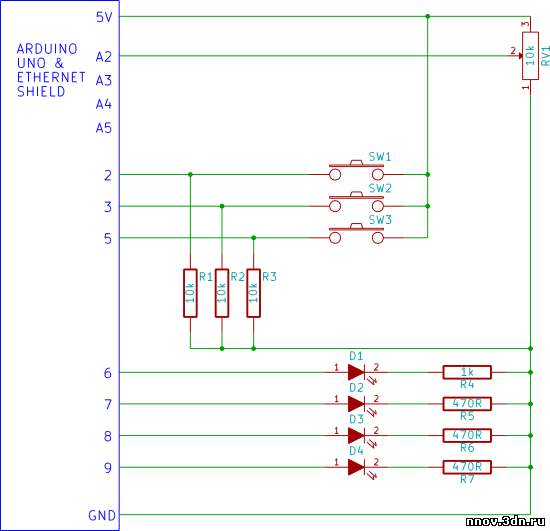
In the video, A3 was connected to a voltage divider, A4 was connected through a resistor to GND and A5 was connected through a resistor to +5V – not shown in the circuit diagram.
Overview of How the Web Server Works
After a web browser has requested and loaded the web page from the Arduino web server, the JavaScript in the web page will send an Ajax request for data from the Arduino every second.
The web page that the Arduino web server hosts is shown here:
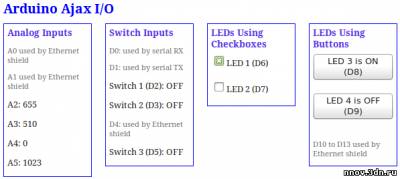
Web Page Hosted by the Arduino Web Server
The Arduino will respond to every Ajax request by sending an XML file back to the web browser. The XML file contains the values from the four analog inputs of the Arduino (A2 to A5), the state of three pins (switches on pins 2, 3 and 5) and the state of the four LEDs.
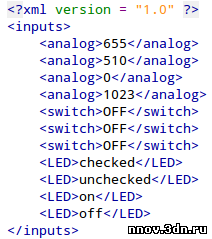
XML File Sent by Arduino
When an LED is switched on from the web page by checking a checkbox, the JavaScript will send the state of the checkbox (send an instruction to switch the LED on) with the next Ajax request. The same will occur if the LED is switched off or if one of the buttons is used to switch an LED on or off.
Source Code
The source code for both the Arduino sketch and web page are a bit big to include on this page. It is suggested to download these files below and open them in your favourite editor when following the explanation below.
Arduino sketch and web page:
web_server_IO.zip (4.7 kB)
Running the Example
To run this example, first copy the web page (index.htm) from the above download to a micro SD card. Insert the micro SD card in the card slot of the Ethernet shield. The Ethernet shield must be plugged into an Arduino board, connected to your network and powered by USB or an external power supply.
Build as much of the circuit as you want. If you don't connect anything to the input pins, they may just toggle randomly as they pick up noise. Inputs can always be pulled high or low through a resistor if you do not want to connect them to switches or a potentiometer.
Load the Arduino sketch (eth_websrv_SD_Ajax_in_out) from the above download to the Arduino.
Surf to the IP address set in the sketch using a web browser – you should see the web page loaded and the analog values and switch values updated every second.
How the Example Works
The Arduino sketch and web page are basically modified versions of code from previous examples in this multi-part tutorial. The files are modified versions from the examples that use Ajax with XML (part 14 and part 15).
Analog and Digital Inputs
The analog inputs (analog values) and digital inputs (switch states) are requested and received the same ways as explained in part 14 of this tutorial, except that the analog values are all enclosed in <analog> tags and the switch states are all enclosed in <switch> tags – i.e. they do not use unique tag names for each input.
When the JavaScript in the web page receives the XML file from the Arduino, it uses one for loop to extract the analog values and a second for loop to extract the switch states.
The JavaScript code for extracting the analog values from the XML file is shown here:
var num_an = this.responseXML.getElementsByTagName('analog').length;
for (count = 0; count < num_an; count++) {
 document.getElementsByClassName("analog")[count].innerHTML =
 this.responseXML.getElementsByTagName('analog')[count].childNodes[0].nodeValue;
}
The first line of the above code gets the number of items in the XML file that are enclosed in <analog> tags and stores it in the variable num_an which is then be used in the for loop to get the correct number of analog values.
In the for loop, the following code gets hold of each HTML span that has the class analog:
document.getElementsByClassName("analog")[count].innerHTML
Which gets hold of each span element in the following HTML:
<p>A2: <span class="analog">...</span></p>
<p>A3: <span class="analog">...</span></p>
<p>A4: <span class="analog">...</span></p>
<p>A5: <span class="analog">...</span></p>
This line of code then gets each analog value from the XML file in turn:
this.responseXML.getElementsByTagName('analog')[count].childNodes[0].nodeValue;
So the above two lines of JavaScript code working together get each analog value from the XML file in the order that they appear in the file and insert these values into each span in the order that they appear in the HTML.
The switch values work the same way, but each HTML span with the class name switches has a value from the XML file with the tag switch inserted into it in the order that they appear.
LEDs
The Arduino keeps track of which LEDs are on and which LEDs are off. This information is sent back as part of the XML file in response to the Ajax request that occurs every second.
In the Arduino sketch, the following array stores the LED states (stores 1 for 'on' LED and 0 for 'off' LED):
boolean LED_state[4] = {0}; // stores the states of the LEDs
This array is initialized with zeros – all LEDs off. Each element of the array corresponds to an LED in order from LED1 to LED4, i.e. LED_state[0] stores the state of LED 1, LED_state[1] stores the state of LED 2, etc.
LEDs Using Checkboxes
In the JavaScript code, the following lines of code show how the state of LED 1 is extracted from the received XML file and used to update the checkbox – i.e. to mark it as checked or unchecked, depending on the state of the LED.
// LED 1
if (this.responseXML.getElementsByTagName('LED')[0].childNodes[0].nodeValue
 === "checked") {
 document.LED_form.LED1.checked = true;
}
else {
 document.LED_form.LED1.checked = false;
}
In the above code, if the first value (i.e. for LED 1) from the XML file in an <LED> tag contains the text checked then the corresponding checkbox is checked using this line of JavaScript:
document.LED_form.LED1.checked = true;
Otherwise the checkbox is unchecked.
This ensures that every browser that connects to the Arduino web server displays the correct states of the LEDs because they are receiving the LED states every second.
When a user checks or unchecks a checkbox, then the next Ajax request will include the LED name and state with the next HTTP GET request.
The JavaScript function GetCheck() is run whenever a checkbox is clicked. If the checkbox for LED 1 is checked, then the value of a string for LED 1 is set:
strLED1 = "&LED1=1";
If the checkbox is unchecked, the the string is set as follows:
strLED1 = "&LED1=0";
The next time that GetArduinoIO() function is called, which occurs every second, the strLED1 string will now not be empty. This string will now be included with the GET request:
request.open("GET", "ajax_inputs" + strLED1 + strLED2 + strLED3 + strLED4
 + nocache, true);
All the other LED strings will be empty if a checkbox or button has not been clicked, so will not be included with the GET request.
After the get request has occured, all LED strings are set back to empty:
strLED1 = "";
strLED2 = "";
strLED3 = "";
strLED4 = "";
When the Arduino receives the Ajax GET request, the SetLEDs() function in the Arduino sketch checks for a change of LED state in the received GET request and if it finds one will switch the corresponding LED on or off and then save the state of the LED to the LED_state[] array.
LEDs Using Buttons
The buttons that control the LEDs work in the same way as the checkboxes, except that each button has its own JavaScript function that runs when a button is clicked.
The text on the buttons is updated to show the state of the LEDs that they control.
Buttons do not have a 'checked' property, so the current state of each button's LED is stored in a variable:
var LED3_state = 0;
var LED4_state = 0;
Storing the button state is necessary so that when the button is clicked again, it knows whether to update the string that is sent with the GET request to switch the LED on or off.
When the Arduino sends the state of the LEDs in the XML file that are controlled by the buttons, it inserts "on" or "off" between the <LED> tags instead of "checked" or "unchecked" as it does for the checkboxes.
Источник http://startingelectronics.org/tutorials/arduino/ethernet-shield-web-server-tutorial/SD-card-IO/
|