|

Режимы работы
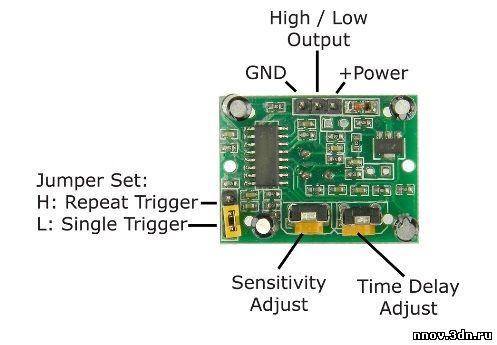
Режим работы модуля задается перемычкой . Есть два режима — режим H и режим L. На фото выше в модуле установлен режим H.
Режим H — в этом режиме при срабатывании датчика несколько раз подряд на его выходе (на OUT) остается высокий логический уровень.
Режим L — в этом режиме на выходе при каждом срабатывании датчика появляется отдельный импульс.

Пример скетча
// Declare Constants
const int sensorPin = 2; // PIR Sensor is attached to digital pin 2
const int ledPin = 13; // Built-in LED
const int ledBlinkTime = 500; // Blink one for half a second while calibrating

// Wait for the seonsor to calibrate (20 - 60 seconds according to datasheet)
// 60 Seconds in milliseconds
const unsigned int calibrationTime = 60000;

void setup() {
 Serial.begin(115200);

 pinMode(sensorPin, INPUT);
 pinMode(ledPin, OUTPUT);

 // We need to wait one minute for the sensor to calibrate
 // Get out of view of the sensor for this duration!

 // Blink the LED while calibrating
 for (unsigned int i=0; i<calibrationTime; i+=ledBlinkTime*2) {
 digitalWrite(ledPin, HIGH);
 delay(ledBlinkTime);
 digitalWrite(ledPin, LOW);
 delay(ledBlinkTime);
 }
}

void loop() {
 // Constantly check the state of pin 2
 // If it is HIGH the sensor is detecting motion
 if (digitalRead(sensorPin) == HIGH) {
 // Turn the LED on
 digitalWrite(ledPin, HIGH);

 // Tell the host computer we detected motion
 Serial.print(1);

 // Sleep for a second to prevent flooding the serial
 delay(1000);
 } else {
 // Turn the LED off
 digitalWrite(ledPin, LOW);
 }
}
После включения надо подождать одну минуту, пока сенсор производит калибровку, и только тогда уже проверять его работоспособность.
| 


